
I have chosen to develop my own interpretation of the starting point 'Fantastic and Strange' because I have immediately started creating ideas that I can then go on to develop. In order to start this project I have researched into photographers such as Mari Mahr, Ian Strange, Jerry Uelsmann, Penny Jensz, Igor Morski and Norman McLaren.
I have chosen to develop my own interpretation of the starting point 'Fantastic and Strange' because I have immediately started creating ideas that I can then go on to develop. In order to start this project I have researched into photographers such as Mari Mahr, Ian Strange, Jerry Uelsmann, Penny Jensz, Igor Morski and Norman McLaren.

|
For me to start this project I decided to create a mind map displaying the artists that I researched who all used a variety of different 'Fantastic and Strange' elements in their work. I decided to include key points such as different ideas that I came up with and other areas of my interpretation in which I can develop on. Researching a numerous amount of artists helped me develop my own photo-shoot and interpretation because I have taken inspiration from them and I was able to compare their styles to my own. This helped me improve with different styles.
|
|
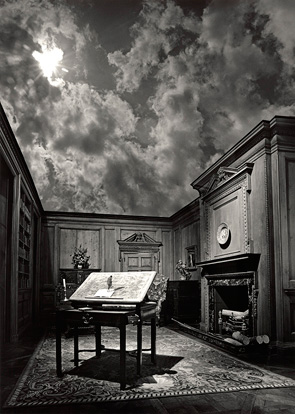
Mari Mahr is a Hungarian artist who specialises in using black and white images of the impossible, such as giant people in small towns, paper across a set of steps and huge books above the houses as pictured to the right. Her images are rather strange and bizarre because the subjects are random and her work doesn't always convey a message. Mari Mahr's 'Symbols of Ourselves' (2002) has a message about the different cultures and backgrounds of people. However, the strange part is that it is displayed through the appearances of dolls, this also makes the series more interesting.
|
|


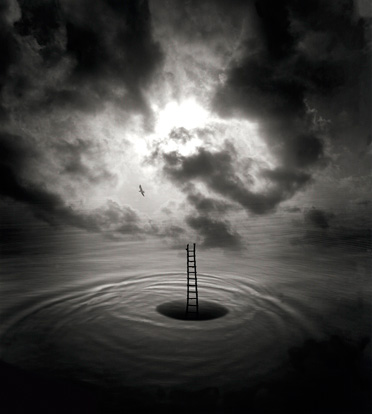
'New Places – New Codes' (2000) Analysis

|
'New Places - New Codes' is a series of images by Mari Mahr and I decided to analyse this image from the series because it will benefit me the most when developing my own images. This image shows a giant book on a large pathway and everything is captured in black and white which allows the image to blend well since they isn't a contrast in colours. You can see that the image has had work in Photoshop quite easily and the shallow depth of field of the book compared to the deep-depth of field background makes the image look very unrealistic because of this. Mari Mahr takes makes her images based on vague recollections of memories that she had as a child which is probably the reason for her images being so creative and unique. The composition of the image is extremely affective because you can see the background in great detail and the book isn't in the way. From looking at Mari Mahr's work I can experiment with this style to develop my final piece and I can also create a wider variety of images.
|
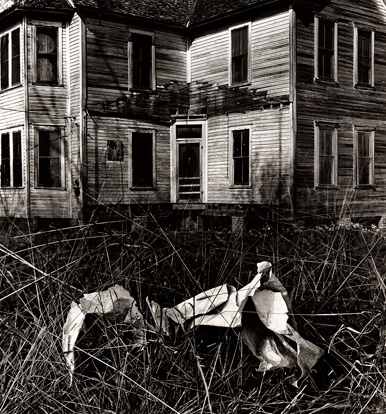
Ian Strange focuses on creating multiple series of images of suburban homes in his 'Suburban' series. He spray-paints and sometimes burns the houses down to create his perfect composition of the landscape that he had envisioned. His work is definitely unique and strange because not many other artists go to the lengths of burning down buildings to create the perfect series of images. The images to the right show some of the different images that feature in his 'Suburban' series.
'Harvard Street' (2012) Analysis

|
I decided to analyse this image due to the excessive Photoshop work that will help me when creating my own response to the starting point 'Fantastic and Stange'. The contrast in colours is different to anyone else that I have researched because Ian Stange uses complementary colours to make his images stand out. The glowing yellow hue makes the image more interesting, however, it takes away attention from the house that has a huge red 'X' spray painted across it. The lighting in this image makes it very effective as well because the house is almost shining and the image isn't dull and boring like you might get without the artificial lighting. The lighting in the background is also very effective because the blue sky fades to black and this looks better than having an almost solid colour. Ian Stange creates these images to visualise his idea of the suburbs. He decided to reduce the houses as an idea of being a house and turn them into what he calls 'Icons'. From looking at Ian Stange's work I can experiment with Photoshop to make photographs more interesting by adding a spray paint effect to the subjects in the images.
|


|
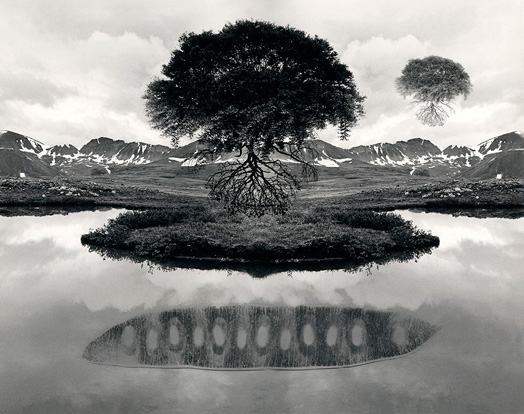
Jerry Uelsmann is a photographer who also uses black and white images to make his work interesting and blend well together. He also uses a slight sepia tone because his work doesn't appear to be solid white but more yellow-tinted. His photo-manipulation skills, including a huge amount of double exposure pieces, can really benefit me when I brainstorm ideas for my final response. I have decided to analyse 'Journey into Night' because it would be the most beneficial for me when developing my ideas to the starting point 'Fantastic and strange'.
|
|
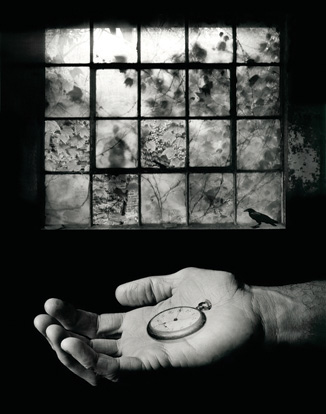
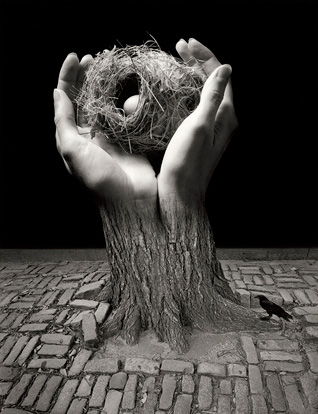
'Journey into Night' (2006)
|
This image shows a Photo-manipulation of hands holding a nest. The interesting part of the image is that the hands are coming from a tree trunk which is planted in bricks. The use of a raven is also a nice touch and the background is very effective because it's solid-black so that it doesn't distract you from the subject matter. The lighting in this image is very effective because it allows the separate photographs to blend together into the final image, although the original natural lighting of the tree and the bricks makes the unnatural lighting of the hands less realistic. From looking at Jerry Uelsmann's work I have looked in to how his creative ability really influences his work and this will be a key point in my own interpretation as well as his ability in Photoshop to blend the images very accurately is also something I will consider in my own work. When creating my own work I want to experiment with this photo-manipulation style except I want to include colour because the image can look a bit boring without colour so including multiple colour will definitely improve this style and make it more eye-catching. The most important part of Jerry Uelsmann's work is the values of his pieces because of them being black and white he uses the values to create separation in his images.
|
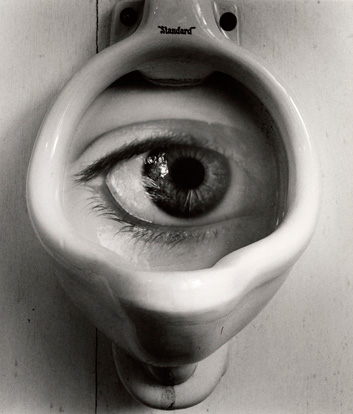
Penny Jensz is an artist who uses mixed media to create her intended images. She has a wide variety of work, however, her series of images with John Bodin titled 'Visceral' is by far the most eye-catching. I decided to look at this work in particular due to its unique style and range of variations between the images. I have chosen to analyse this series because it would benefit me when producing my own interpretation of the starting point 'Fantastic and Stange'.This series suits the 'Fantastic and Stange' theme more than any other because of just how bizarre the series is, as well as how well the separate photographs come together to make one image.


'Visceral' Series Analysis

|
In this series, we see the initial photographs with studio lighting and backdrops, then we see the Photoshop-edited images after. This increases the impact of the final images because you can see the attention to detail within the images. In this particular image you can see the difference in tones and exposure as well as the obvious goat-skull that looks like it has been ripped in various places. The title of this series is 'Visceral' which means deep inward feelings than to the intellect which makes me think that the series of images is supposed to represent the subjects' feelings. From looking at this series of images i can create my own version of this style and experiment with mixed media and the different techniques used to create these kind of images. I like the texture of the ripped paper because it makes the image so much more realistic and detailed.
|
Igor Morski is probably the most diverse artist out of the artist's that I've researched due to his multiple abilities including Photography, Photoshop, Illustration and more. He combines these abilities to make strange but fantastic images, including the ones pictured to the right. From looking at Igor Morski's work I can develop my own skills across these fields which will enable me to create images of my own that suit the theme 'Fantastic and Strange'. I have chosen to analyse 'Ravens' due to its work in Photoshop and how it's different compare to any other image I have found so far.


'Ravens' Analysis

|
This image depicts a female's face in the mixture of ink splatter, geometrical patterns and a variety of different lines and textures. The most effective part of the image is the texture of the woman's face; it combines the rough, grainy skin with a low-opacity Photoshop splatter-brush to create an interesting and powerful image. The texture on the face also matches the grungy, green background. The composition is superb because of how the face is centred and and placement of the ravens is almost symmetrical this makes the image look balanced and there isn't any negative/blank space. Perhaps the image is almost too cluttered but I think the best improvement to this image would be to change the lack of colours although since the piece is called 'Ravens' its probably supposed to have dark and grim aesthetics. Even though the dull, green appearance might not be very visually appealing, Igor Morski has still made excellent use of how the image can blend very well because of this. I think a simple vignette effect would make this image stand out and look more eye-catching.
|
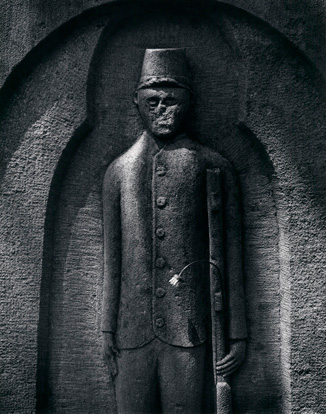
Norman McLaren's 'Pas de deux' (1968)
|
|
Norman McLaren uses light to make his work very effective and interesting. The images to the right are captured from his 1968 'Pas de deux'. The images are interesting because they combine frames to show movement. From looking at Norman McLaren's work I can experiment with lighting and shadows to create contrasting images of various subjects. To make these images more creative I am going to experiment with colour and add my own style to this work.
|
|


Mari Mahr - Photoshoot
|
To begin my experimentation when working with similar styles that Mari Mahr creates I would obviously have to start with taking initial photographs. I planned to take photographs of various different images in the hopes that I would be able to merge the images together in a photo-manipulation style to almost replicate Mari Mahr's work. I have taken photographs of different scenery, subjects and overall, a contrast of images that I can then develop in Photoshop. When looking at Mari Mahr's work I already began to imagine how I can add my own unique finish to the images and my first opinion was that the images needed colour to make them more interesting and appealing to the viewer. I also planned to take images of different textures so that I can overlay and intertwine them with my other photographs to add to the overall feeling of the final image.
|
|
Mari Mahr - Edits


My first four images were made in a vibrant, colourful format because they were more effective and that they were more eye catching. The use of colours was exaggerated since Mari Mahr's images were already supposed to be unrealistic. The editing was done in Photoshop to capture the desired effect and the overall purpose of these images was to experiment with different styles to develop my final piece. I used a variety of different tools that I have explained below.
|
|
My first image uses a variety of mixed media to create the detail within the image; the main subject - the text - being made in Cinema 4D really adds to the photo-manipulation style that I was aiming for. The second image is a mixture of merged photographs, just like the others, to replicate Mari Mahr's style. I then decided, when making my third edit, that I should add some soft brushes on the blending mode overlay to create more of an effect within the image. The fourth edit follows the same trend with the multiple images to recreate Mari Mahr's style.
|


After I had made my first four edits I decided that to get the desired Mari Mahr effect, I would have to make the images black and white. I decided to do this as well as a few other tweaks to refine my images as shown below.


|
|
|
| ||||||||
If you would like to see how the images were made then please download the .gif files above to see a nice, short development of the four images above.
Ian Strange - Photoshoot
|
When beginning my initial photo-shoot which was inspired by Ian Strange, I decided to take a lot of photographs of structures, patterns and scenery so that I could create edits involving multiple images to try and replicate Ian Strange's style. I focused on experimentation to see what works best for me and this would help me when developing a final outcome. I could use the skills that I have learnt so far as an advantage when creating new pieces and continuously developing. I planned for my initial photographs to be a good starting point since I normally edit them after in Photoshop and they are always improved because I also make refinements after.
|
|
Ian Strange - Edits


|
|
I began editing my images by creating the first cover piece which features text stating "Inspired by Ian Strange". The image was edited in Photoshop and due to this, I was able to add textures to the coliseum as well as the text. There were also a few colour corrections as well as adjusting the exposure of the image because the original was shot in natural lighting. The second image follows a similar method of editing, but instead of adding a texture I decided to change the colours of the bricks to create a pattern on the walls. This made the image far more interesting and I really like the outcome of this piece. I experimented with different colours for the pattern as shown later on in the refinements. The third image, and the most accurate at Ian Strange's style, involves a simple colour correction followed by adding a circle to the center of the canvas. The most difficult part was removing the people from the images but it made the blue circle the center of attention which is what I intended. I liked how the colours complemented each other to make the image more appealing although I decided it could be better so I refined it. The fourth edit was an exaggerated version of this previous effect and it was create for experimental purposes. I really like this edit because the colours are very effective and the inverted colours make the image interesting. I made this image using soft brushes on the 'soft-light' blending option as well as other adjustment layers.
|


The first four edits really captured some of the techniques that I could possibly use when creating my final interpretation of 'Fantastic and Stange' but I decided to refine the edits just to experiment with the different styles. Some of the changes involved changing the saturation of the images and adding brushes to make a 'painted' effect to the structures.
|
|
|
| ||||||||
Jerry Uelsmann - Photoshoot
|
For my third photoshoot I felt that it was appropriate to take multiple images of different subjects so that I could then later manipulate the photographs to create one image. This is shown in my edits with screenshots and animated GIFs to show the progress of creating the images. I took photographs concentrating on the depth of field because I didn't want to have a really short depth of field otherwise it might have been more difficult to make the image blend more realistically and this would've taken away the desired effect. The lighting was also a key element of each of the images due to having to recognize where the different light sources are coming from so that the shadows are in place and nothing looks too out of place.
|
|
Jerry Uelsmann - Edits


|
|
For my first image, I decided to take two of my initial photographs and crop one of them so that it was just an image of an iphone. I then decided to mask out part of the iPhone so that It looks like it's behind the structure of the coliseum. This allow me to create a manipulative style as seen in Jerry Uelsmann's work and since I have been making cover images for my first edit, I decided to incorporate an original piece from Jerry Uelsmann to add the effect as if the iPhone was turned on and displaying the work. For the second image I decided to do more experimentation when using the 'waves' tool to create ripples in the image and then I continued to mask out different sections to create the image. I also used filters in the Filter Gallery to create a 'pencil sketch' effect. This was then masked and cropped to show only a segment of the image with the new effect. My third image, and personally my favourite from this series of edits, takes a different path of using colour to make the image stand out amongst the rest. The image includes two initial photographs (just like the last two edits) that I have manipulated to create a Jerry Uelsmann style. I began by using a displacement distortion of my hand on top of the photograph of the coliseum so that the photograph would now ripple to match the different shades of my hand. I then masked the photograph of the coliseum after creating a selection that would outline my hand. Soon after I decided to use a gradient map to make the image have very distinct, eye-catching colours. The only thing left was to change the shadows and highlight which I done rather quickly by using one simple exposure layer. I also decided to add noise to the image to prevent gradient blocks. For my final image I used three different photographs
|


To create the signature Jerry Uelsmann style, I refined my images by grey-scaling them since Jerry Uelsmann's work involves a lot of non-vibrant/low saturated colours if there is any use of colour at all. Personally, I prefer the images with colour and it shows that I have put my own twist on the images. This has helped me with developing my final outcome because I know that the image will look more appealing to the viewer if I can incorporate colours.
|
|
|
| ||||||||
Penny Jensz - Photoshoot
|
My photoshoot for my Penny Jensz series focusses on taking multiple images of the same subject but from different angles and perspectives - similar to the work of David Hockney. I have collected these photographs of different animals and lights which I have then progressed to editing the images to create a similar effect of Penny Jensz's style. The images contrast with different colours which I was very pleased with as Its beneficial for a more diverse gallery of images. A problem I had to resolve was the exposure of the image since the natural lighting was a bit too bright in the original photographs.
|
|
Penny Jensz - Edits


|
|
When editing my first image I decided to mask the images by making a jagged selection to recreate the ripped paper effect. I could have taken photographs of ripped paper to make the effect a bit more realistic, but I decided It wasn't necessary. A key part of my edits was the contrast in the colours because I decided to use adjustment layers to make the different sections look more like different images. For my first image I decided to start off by implementing text into the image which reads "Inspired by Penny Jensz", the text fills in the blank space in the image and blends well with the rest of the image. I also changed the colours of different sections to make the image have a range of colours. This worked well, so I decided to continue with my series of edits - taking note of what I had learnt when experimenting. For my Second image I decided to use the lighting to make the images contrast. This made different parts of the image stand out amongst the rest and I also used the colours to do this as well. The second image also has a texture over the top of a few areas to make the image look like the different ripped papers show age and that they have been damaged. This is supported by the ripped style. The third image used more black, drop shadow than the other images to make the different photographs look separate since I didn't change the colours too much in comparison to the other edits. I wasn't too satisfied with the outcome of the third image but I decided to refine it later on anyway. The fourth image is different from the others due to the use of three different colour-modes of the original photograph. It also has a distortion of the original photograph to make the image more interesting.
|


After creating my first four edits I decided to refine them by changing colours, compositions and more. My favourite image is the third one because the contrast between the grey and the red makes the image stand out and it's very effective. If I were to continue with this style I would most likely use black and white segments as shown in the last two refinements.
|
|
|
| ||||||||
Igor Morski - Photoshoot
|
When planning my photoshoot I decided I wanted to focus on different elements such as lighting and texture so that I can create a series of edits similar to the work of Igor Morski. Later I would be using brushes in Photoshop to create a 'splatter' effect - similar to 'Ravens'. Just like many of my other photoshoots, I have photographs of various different subjects so that I can create a diverse range of images. I used different depths of field to focus on the subjects chosen which I could then edit on Photoshop and create different effects such as double exposures.
|
|
Igor Morski - Edits


|
|
For my first edit I decided to continue with the use of text within an image and I have done this by having a title that reads "Inspired by Igor Morski" this was to make the images more interesting as there wasn't a particular subject that stood out in the image. It also looked better with the inverted-colour effect which can be seen throughout the rest of the image. I used brushes to mask out the inverted-colour layer this gave the image a strange effect and then i decided to go one step further by adding 'splatter' brushes to the image. This was to replicate a similar style used in the work of 'Ravens' by Igor Morski. The image is in black and white because Igor Morski tends to use very low-saturated colours and I preferred a grayscale image over a monochrome image. For my second image (my favourite from this gallery of images) I decided to use less of the 'splatters' and more of the distorted image style. I have done this by using the 'wave generator' tool, but a similar effect can be created with the 'liquify' tool. This had made the image look fairly strange, so I decided to duplicate the layer, distort it even more and change the blending mode to screen so that only the bright values would be visible. This gave it a sort of effect that you might see on an old VHS tape. The colours in the image, are yet again, very low-saturated but not completely black and white but rather a very pale green in different areas. The third image took a different turn when using brushes to build an effective image. I made a double-exposure effect by copy and pasting the same image and setting it to the blending mode screen just like the previous edit. I then used black and white 'splatter' brushes to blend the subject in with the background a bit more and finally I distorted the image so that it made a line pattern which i placed in the background. This image is completely black and white. The fourth image is more simple; the original photograph has been inverted and masked by a heavily distorted brushes. There were also a few colour corrections but I decided to use more vibrant colours than the other just to experiment with what the outcome would look like.
|


When refining my images I decided to add colour to make the images look more interesting although some of the images are more effective in black and white. From experimenting with these edits I have learnt that I can incorporate black and white segments to an image to make different sections stand out and will most-likely use this in my final outcome of the project.
|
|
|
| ||||||||
Norman McLaren - Photoshoot
|
I started my Norman McLaren inspired photoshoot by taking photographs of different subjects, but then I decided that the lighting would have a key part in creating a similar effect to the work of Norman McLaren. Although I would be editing the images in Photoshop after and I could have always changed the light there, it gave me a better starting point to have a dark setting in the original photographs. I also took images of different textures that I could manipulate into the edits. This would enable me to create similar style images to the work of Norman McLaren.
|
|
Norman McLaren - Edits


|
|
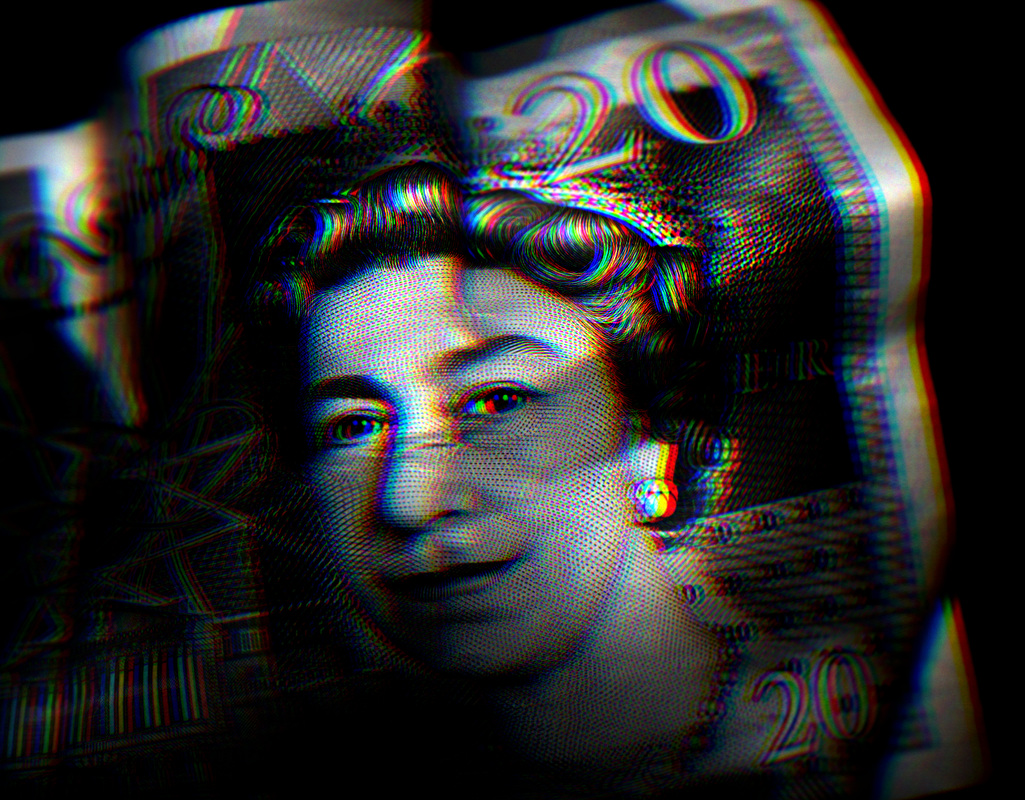
For my first edit I decided to begin with a cover edit as usual including text reading "Inspired by Norman McLaren". This series mostly had a low key style with the amount of black in the images. The first four edits are all grayscale to replicate the Norman McLaren style. The first image involved a lot of work with a brush - drawing over highlights to make the image more impactful. I also used adjustment layers so make the image blend better. The second image was the original photograph with a few colour adjustments involving brightness and saturation. I liked how the reflection made the image contrast with the black and white. The third image involved a lot of adjustments with the highlights and shadows using the exposure tool. This was so that the creases in the paper were clearly visible and more impactful. I used low-opacity brushes to brighten different parts of the image as well as darkening parts of the image. This made the queen's face stand out whereas the background is a solid black. The fourth edit is a lot darker and once again, this was exaggerated in Photoshop since I was doing a low-key style. Just like the previous mage I decided to highlight certain areas and darken certain areas by using the dodge and burn tools in Photoshop. I refined my images by including colour and changing different features. My first image involved a change in the background colours as well as changing the colours of the highlights. The second image involved adding a gradient layer over the image to give the image a mixture of colours. The third image, I decided to stylize in anaglyph form. This was done by separating the red, green and blue values of the image. The fourth image was done in a similar way but I decided to enlarge the different channels instead of just moving them.
|


|
|
|
| ||||||||
Final Photoshoot
When planning for my final photo shoot I decided I would go along with the subject of a Darth Vader helmet with slight variations throughout the photo shoot. What else could be more perfect for fantastic and strange? I took photographs from different angles and I also used different sources of lighting. This gave me a variety of different images to work with and then I could manipulate them in Photoshop. I went with a darker theme when taking photographs as I felt it would be more suitable for the subject. It would make the images more effective and a low saturation would blend well with it.


Final Outcome
For my final outcome I decided to go along with a darker style, I started by taking photographs of a Darth Vader helmet. I specifically focussed on the lighting so that the key sections were captured. I decided I wanted to present one big image on eight different A3 sheets. This would make my work look bold and stand out. I started by sketching the head of Darth Vader in Photoshop, I would then transfer this to Adobe Illustrator and create a vectorised drawing. After that was done I then decided to distort it and create a more effective image. I planned to take a various amount of images so that I would have more than enough to work with in Photoshop.
|

|


| 33.gif |
| evaluation3.pub |

